
How to Identify and Measure a Replacement Bearing
Date Posted: 24 August 2026
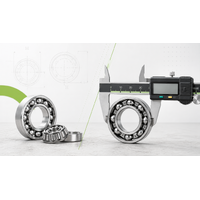

How to Identify and Measure a Replacement Bearing
To identify and measure a replacement bearing, you need three core dimensions: the inner diameter (ID), outer diameter (OD), and width (W). Measure these using a digital vernier calliper accurate to 0.01mm. These three figures, combined with the bearing type and seal specification, are everything a supplier needs to find your replacement, even without an original part number.
Bearings fail. When they do, the clock starts ticking, and the last thing you want is to order the wrong size and add days of downtime to the problem. The original part number has worn off. The equipment manual is long gone. The bearing came out in pieces.
This guide walks you through the complete process of identifying and measuring a replacement bearing: the tools you need, the measurements to take, how to read a bearing part number, and exactly what to tell your supplier. By the end, you'll be able to specify a replacement bearing with confidence, even if you're starting with nothing but the bearing itself.
What Is a Replacement Bearing and When Do You Need One?
A bearing is a mechanical component that supports a rotating shaft, keeps moving parts correctly aligned, and reduces friction between them. Bearings are found in almost every piece of rotating machinery, from electric motors and gearboxes to wheel hubs, conveyor systems, agricultural equipment, and domestic appliances.
You need a replacement bearing when you notice any of the following failure signs:
- Unusual noise: grinding, rumbling, or squealing from a rotating component
- Excessive vibration or rough running
- Localised heat around a bearing housing
- Visible play or looseness in a shaft
- Bearing seizure or complete mechanical failure
In an ideal world, you'd find a legible part number stamped on the bearing's outer ring, look it up, and order a direct replacement. In practice, part numbers are frequently worn away by age, heat, contamination, or physical damage. On older equipment, documentation may simply not exist. When the part number is gone, accurate measurement is your only reliable path to the correct replacement.
---
Tools You Need to Measure a Bearing
To measure a bearing correctly, you will need the following:
- Digital vernier calliper (essential), accurate to 0.01mm
- Micrometer (optional, for high-precision measurement)
- Clean cloth or rag to clean the bearing surfaces before measuring
- Notepad or phone to record measurements immediately
Digital Vernier Calliper (Essential)
A digital vernier calliper is the standard tool for bearing measurement. It measures inner diameter, outer diameter, and width using a single instrument and displays the result on a clear digital screen, eliminating the reading errors common with analogue callipers.
Recommended accuracy: 0.01mm or better. Bearing dimensions are precise, a 0.1mm error in bore size can mean the difference between a bearing that fits correctly and one that is dangerously loose or impossible to install.
Micrometer (Optional but Recommended for Precision Work)
A micrometer offers greater accuracy than a calliper for shaft and bore measurements, particularly when working with interference fits where tolerances are very tight. If you are measuring bearings for a high-speed or high-load application, a micrometer is worth using to verify your calliper readings.
What to Avoid
Do not use a tape measure, steel rule, or any flexible measuring tape. These tools cannot achieve the accuracy required for bearing measurement. A steel rule might get you within 1–2mm, but bearing dimensions operate in fractions of a millimetre, and that margin of error will result in an incorrect order.
The Three Key Measurements of a Bearing
Every bearing is defined by three core measurements: inner diameter (ID), outer diameter (OD), and width (W). These dimensions are measured in millimetres for metric bearings and inches for imperial bearings. Together, they form the boundary dimensions standardised under ISO 15:2017, the international standard for rolling bearing dimensions.
| Measurement | Also Known As | How to Measure | Typical Range |
|---|---|---|---|
| Inner Diameter (ID) | Bore diameter, d | Calliper inside jaws across bore | 3mm, 200mm+ |
| Outer Diameter (OD) | Outside diameter, D | Calliper outside jaws around ring | 10mm, 400mm+ |
| Width (W) | Thickness, B | Calliper across flat faces | 3mm, 100mm+ |
Inner Diameter (ID): The Bore Size
The inner diameter is the diameter of the central hole through the bearing, the measurement of the bore that fits onto the shaft. It is also called the bore diameter.
How to measure: Open the calliper's inside measuring jaws, insert them into the bore of the bearing, and expand until they contact the inner ring on both sides. Read the measurement across the widest point of the bore.
Important warning: If you are measuring a worn bearing, the bore may have increased in size due to wear or creep on the shaft. Always treat a worn bearing's ID with caution, use the OD as your primary cross-reference when possible, and verify against manufacturer data.
Outer Diameter (OD)
The outer diameter is the measurement across the full outside of the bearing, from one side of the outer ring to the other.
How to measure: Place the calliper's outside jaws around the bearing's outer ring and close them until they contact the surface. Measure across the widest point.
Tip: Take two OD measurements at 90° to each other. If the results differ, the outer ring may be worn or distorted, flag this to your supplier.
Width (W)
The width is the depth of the bearing measured along the axis of the shaft, essentially the thickness of the bearing from one flat face to the other.
How to measure: Lay the bearing on a flat surface. Place the calliper across the two flat faces of the bearing and measure the distance between them.
Note: In thrust bearings, this dimension is sometimes referred to as "height" rather than width, as these bearings sit differently in their housings.
How to Measure a Replacement Bearing: Step-by-Step
Follow these steps in order for accurate, reliable measurements:
How to Identify Whether a Bearing Is Metric or Imperial
Metric bearings are measured in millimetres; imperial bearings are measured in inches. Metric is the global standard and the most common type you will encounter. However, imperial bearings remain in use in older UK machinery, US-manufactured equipment, and agricultural applications.
How to tell the difference:
- Metric: Your measurements produce round millimetre numbers, for example, 25mm ID, 52mm OD, 15mm width.
- Imperial: Your measurements in millimetres don't produce round numbers, but dividing by 25.4 gives a common fraction, for example, 25.4mm ÷ 25.4 = 1 inch exactly.
Practical tip: Always measure in millimetres first. If you get an awkward number like 31.75mm, divide by 25.4, the result (1.25, or 1¼ inch) suggests an imperial bearing.
| Imperial Size | Millimetre Equivalent |
|---|---|
| ½ inch | 12.7mm |
| ¾ inch | 19.05mm |
| 1 inch | 25.4mm |
| 1¼ inch | 31.75mm |
| 1½ inch | 38.1mm |
| 2 inch | 50.8mm |
Be aware of mixed-origin machinery. A Japanese-built machine may have metric bearings on a nominally imperial shaft, or vice versa. If measurements don't resolve cleanly into either system, consult the equipment manufacturer's documentation or contact a specialist supplier.
How to Read a Bearing Part Number
Most bearing part numbers follow a standardised system where the digits encode the bore size, bearing series (load capacity), and type. Understanding this system means you can decode a partial number, or identify a compatible cross-reference, even without a full readable code.
The ISO Bearing Numbering System
Bearing part numbers consist of a prefix, main number, and suffix. The main number is the most important section.
Example: 6205-2RS
| Section | Code | Meaning |
|---|---|---|
| Type digit | 6 | Deep groove ball bearing |
| Series digit | 2 | Light series (dimension series) |
| Bore code | 05 | Bore size: 05 × 5 = 25mm |
| Suffix | 2RS | Two rubber contact seals |
The bore code system: For bearings with a bore of 20mm or larger, the last two digits of the main number represent a code. Multiply this code by 5 to get the bore in millimetres. So bore code 04 = 20mm, 05 = 25mm, 06 = 30mm, and so on.
Common Bearing Type Prefixes
| Code | Bearing Type |
|---|---|
| 6xxx | Deep groove ball bearing |
| 1xxx / 2xxx | Self-aligning ball bearing |
| 3xxx | Angular contact ball bearing |
| N / NU / NJ | Cylindrical roller bearing |
| T / 3T | Tapered roller bearing |
| 5xxx / 9xxx | Thrust bearing |
What to Do When the Part Number Is Unreadable
If the part number is completely gone, don't guess. Use your three measurements plus visual bearing type identification to approach a supplier. Most reputable suppliers can identify a standard bearing from ID, OD, width, and type alone. Online cross-reference tools, including those published by SKF (skf.com) and NSK (nsk.com), allow searches by dimension rather than part number.
Even a partial part number is useful. Suppliers can often narrow down a range from three or four legible digits.
How to Identify the Bearing Type Visually
Knowing the bearing type matters because two bearings with identical ID, OD, and width but different internal designs are not interchangeable. A deep groove ball bearing and a cylindrical roller bearing of the same external dimensions serve fundamentally different load requirements.
| Bearing Type | How to Recognise It | Typical Application |
|---|---|---|
| Deep Groove Ball Bearing | Spherical balls, symmetrical appearance, most common type | Electric motors, gearboxes, pumps |
| Cylindrical Roller Bearing | Cylindrical rollers visible in cage, higher radial capacity | Heavy industrial machinery |
| Tapered Roller Bearing | Angled/conical rollers, cup and cone are separate | Wheel hubs, axles, differentials |
| Angular Contact Bearing | Asymmetric inner/outer ring profile | High-speed spindles, paired axial loads |
| Thrust Bearing | Flat disc-like, washers separated by balls or rollers | Vertical shafts, purely axial loads |
| Needle Roller Bearing | Very thin, long needle-shaped rollers | Compact, high-radial-load spaces |
Identifying Seals, Shields, and Internal Clearance
Open, Sealed, and Shielded Bearings
The suffix on a bearing part number tells you what protection the bearing has on its sides:
- Open (no suffix): No side protection. Requires external lubrication. Used where the bearing housing provides its own sealing.
- Z / ZZ: One or two metal shields. Protects against solid particles. Allows some lubricant exchange.
- RS / 2RS: One or two rubber contact seals. Offers superior protection against dust and moisture. Pre-greased and maintenance-free in most applications.
Always match the original seal type unless there is a specific reason to upgrade, for example, moving from a Z to a 2RS where moisture ingress has caused repeated failures.
Internal Clearance (C2, CN, C3, C4)
Internal clearance refers to the total amount of internal play within the bearing, how much the inner ring can move relative to the outer ring. This affects how the bearing performs under temperature change, interference fit, and load.
- CN (Normal): Standard clearance. The default for most applications. If no clearance class is specified, CN is assumed.
- C3: Greater than normal clearance. Used where operating temperatures are high, or where the bearing is installed with a tight interference fit.
- C2: Less than normal clearance. Used in precision or low-vibration applications.
If you are unsure of the original clearance specification, default to CN, it is correct for the majority of general industrial and commercial applications. For technical guidance on clearance selection, refer to the SKF Bearing Catalogue or Schaeffler's technical publications.
What Information to Give Your Bearing Supplier
To order a replacement bearing, provide your supplier with the inner diameter, outer diameter, width, bearing type, seal type, and any known part number or equipment details.
Checklist: Information to give a bearing supplier:
- Inner diameter (ID) in mm or inches
- Outer diameter (OD) in mm or inches
- Width (W) in mm or inches
- Bearing type (e.g. deep groove ball bearing, tapered roller)
- Seal or shield type (Open / Z / ZZ / RS / 2RS)
- Internal clearance if known (C2 / CN / C3)
- Any load or speed requirements (if replacing for a performance upgrade)
- Original part number, even if partial or from a different brand
- Equipment make, model, and year of manufacture if available
The more information you can provide, the faster and more accurately your supplier can confirm the correct bearing. Contact our technical team if you're unsure, supplying your measurements and equipment details is all we need to get started.
Common Mistakes to Avoid When Measuring a Bearing
- Measuring a worn ID as your primary reference. Bearing bores can increase in diameter due to shaft wear or spin-creep. Always cross-check ID against OD and width.
- Measuring at the wrong point. Always measure at the widest point of the OD and the full diameter of the bore, not at an angle.
- Confusing width and height on thrust bearings. Thrust bearings sit differently in their housings; confirm the measurement direction before recording.
- Assuming metric on imperial-origin machinery. US and older British equipment frequently uses imperial bearings, always check by dividing your mm reading by 25.4.
- Ordering on OD alone. OD, ID, and width must all match. A bearing with the correct OD but the wrong bore will not fit the shaft.
- Not cleaning the bearing before measuring. Even a thin layer of dried grease can add measurable thickness to a reading.
Frequently Asked Questions
What are the three measurements needed to replace a bearing?
What tool do I need to measure a bearing?
How do I know if my bearing is metric or imperial?
Can I order a replacement bearing from measurements alone, without a part number?
What does 2RS mean on a bearing?
What is the bore diameter of a bearing?
Need Help Identifying a Replacement Bearing?
Measure the bearing as accurately as possible, note the bearing type and seal arrangement, then contact ReFast with the details if you need help matching the correct replacement.
Contact ReFast